Tuesday, December 25, 2012

Floored

We bought the low-VOC paint for the walls and there was barely a scent. The floor paint, on the other hand, smelled like a clowder of cats got into the basement, had a hissy fit, and marked every corner. We're sitting around the house this evening a little high, not on pot, but on ammonia-scented fumes.

Anyhow, Justin got two coats of our peacock blue on the floor. The color is a little lighter than I've been imagining but I think it looks pretty striking. We think we'll need to put an extra coat down to get an even saturation and coverage. We're hoping to get the floor done by Friday night so we can spend some time this weekend installing base trim and building out the shelving in these two rooms and moving all of our junk back into the rooms.

Here's the snazzy tool room:

Here's the snazzy storage room:

Sunday, December 16, 2012

Ooh la la

The drywall is done; the walls are primed and we are on to the fun part now. Justin and I donned our painting outfits this weekend and broke out the old paintin' tools. Justin rolled and I cut-in and we were able to finish 1.5 rooms and a closet in one day. On the second day, we were a little less productive. Most of the day was spent chasing cracks in the concrete floor with a grinder so we can fill them in with an epoxy and hopefully get a smoother floor to paint. While Justin worked with the epoxy, I wired up all of the outlets in the tool room. Justin installed the trim for the recessed lights and wired up the light in the closet.

This room just needs some concrete patching, some paint on the floor and some baseboard trim and it will be done. The nice cozy gray that we have in our bedroom is on the walls in this room.

On Sunday afternoon, we knocked off some more wall painting: the stairwell and new pantry. We opted to paint the pantry and the wall adjacent to the kitchen the blue that is in the kitchen. Presumably, you'll be able to see this area from within the kitchen and painting it the same color gives a nice continuity.

A rare action shot: me painting.

Here's one tube worth of epoxy in the cracks in our storage room. It looks like we'll be using about 4-5 of these $30 tubes to get this job done.

We will be prepping the floors for paint this next week and hopefully installing base trim soon too. Once these 2 rooms are completed, we are going to be able to move all of our stuff back into the basement!


Wednesday, December 5, 2012

Walls, Ceilings

A few updates on the new drywall in the house...


The bathroom

Tink's a fan of the new walls (let's hope she doesn't mar them up)


Everything looks a lot smaller than before, when your mind can't extend the room beyond the studs. We're looking forward to getting this phase done. We'll be painting before Christmas.

Sunday, December 2, 2012

Toasty Warmth

This basement of ours is looking a lot more like our vision these days. We had the insulators in on Friday and now the basement looks more like a set of rooms, thanks to the opaqueness of the batts. Justin dutifully moved about 2/3rds of our storage up into the extra bedroom and garage to clear the way for the workers. We'll have drywallers in next week so getting this stuff out of their way will help them out.

 Here's our beverage collection. It is nearly a cubic yard of beer, wine and soda. We stockpile. This room literally is hemmed in on all sides now.

 Justin and his dad did a little remediation work on one of the footings for our porch on Friday while the insulation team was in the house. The footing had started to crumble so Justin reused some leftover rebar and formed up a new footing for the column.

 The white insulation helps you imaging what it will look like with walls!

Here's a shot of the storage room all bundled up.

Saturday, November 24, 2012

Amusing myself with cookies

I've had so much fun assembling and decorating my gingerbread replica of our Beacon Hill Bungalow. I've spent most of the day with my hands gooped up with Royal icing and surrounded by cookie crumbs. Here are some photos of my creation.

Front view, complete with our kitties Tink and Pongo in the front yard. I made the porch from chocolate wafer cookies; the columns from candy canes; and the roof of the dormer from chewing gum. The main roof is green-tinted icing with coffee grounds mixed in to give that "composite roof look". 

 Here we are looking south. I took some editorial liberties and didn't build the bump-out for the dining room and planted a tree instead.

 The rear view. Our back porch looks icy and dangerous without a railing.

 From above, with a dusting of snow.

Home sweet home

Friday, November 23, 2012

Grinders

We are down the last item on the to-do list for the basement before we call in the professionals: rough in electrical for accent lights under soffit in living room. Nevermind that we keep finding things to append to the end of the list. Like grinding down the concrete floor so it will be more level and take paint better. And pulling the staples from the ceiling joists.

Justin spent the best parts of black Friday grinding the concrete floor. I spent the best parts cutting out gingerbread pieces to make a miniature replica of our house (more on that later).

 Here's Justin attacking the last 15 sqft of concrete (behind the washer/dryer). He's had a full day of vibrating.


Here's a progress shot--taken at about mid-day. Doesn't the ground side look so fresh and clean? It is really dusty so it's not so clean but it does look fresh!

Next week, we'll be insulating. Er, we'll be paying someone to insulate. And the week after that we'll be paying someone to drywall. It'll be a liveable space soon!

Sunday, November 4, 2012

Closing in...

A view of our new soffits looking westward.

Well, we made a decision on the duct. It's staying where it is. That's option #1 from the previous post. I had 3 construction professionals over and they all thought it was too minor to worry about and maybe not worth spending the money. So, we'll have a little cave of a laundry room.

Despite a really lousy forecast for this weekend, it didn't rain much during the days so re-framing the window in the basement bathroom was more enjoyable for Justin than expected. The only hiccup was a finish nail that went through the vinyl frame of the window and pierced a hole in it. We'll have to figure out how to repair vinyl window frames in the spring. For now, some waterproof tape will have to do. Justin also finished framing in the walls in the bathroom and built a few more soffits. 

We've modified the exterior with a smaller window, salvaged from the back of the house.
 
For my part, I tinkered with a bit more electrical work and hammered in a big bag of the nail guards to protect the electrical wire from the drywall screws. And I caulked in the new window and killed the tube of caulk filling in some other random holes.

Let's take a look:

 An action show of Justin putting some sheathing up to fill in where the larger window once was.

My soffit man.

A little electrical re-org--no sooner do we get it installed then we rip it apart and redo it. This is the switch to the living area. It used to be on the wall that the storage room shares with this room but I thought it might be a better fit on an adjacent wall, twinned up with the switch (yet to be installed) for the under-soffit lighting.

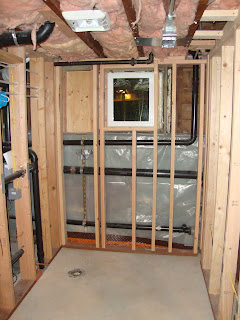
 Here's our tidy little bathroom, with a new little window. Justin had to notch each one of those studs in 3 places to fit over the plumbing in the wall.

Tuesday, October 30, 2012

What to do??

I need a few opinions from any readers out there. We have a conundrum. See, our ductwork in the basement is less than ideal. In retrospect, I would have had the installers of the system originally take a totally different approach but we have what we have and only money can fix it. So, that is where I need some help. Is it worth spending more money and having someone come fix it?

Here's the crux of the issue: The ductwork is too low. Our ceilings are barely 83" in the high spots, before drywall and flooring. Our joists run North/South. Where the ducts need to traverse the ceiling in the East/West direction, they have to mount below the joists. This causes us to lose more height, another 6" to 8" which gives us a clearance of 75"-77" of headroom. Now, unfortunately, the main support beam that holds up the house is at 77" so we are stuck with that clearance when you come down the stairs and turn to the right side of the room. The left side of the room doesn't have any obstructions in the ceiling so we're capitalizing on that area as the living space. But the real stinker is the hallway to the laundry area. The duct that you must walk under is at 75"; that's just 6' 3" and it will be less when we add drywall. Justin is 6' so he barely squeaks under. So, do we do something about it? Here are the options I've come up with:

1. Do nothing; live with it. For the two of us, it isn't a big deal but maybe the prospective buyer (sometime in the long-off future) will scoff at the thoughless arrangement of ducts and soffits and  offer less $$ or not even bite. We were those buyers a few years ago, puzzling over this kind of thing in other homes.

2. Reroute the ducts around the south and east perimeter of the room, building a mile of soffits around the laundry room and picking up the E/W trunk at the far east side of the house. I'm not sure that this is mechanically a sound idea for airflow. I'm sure the cost of this is high--probably $1000 or more.

3. Reroute the cold air return and offending hot air duct into the joists above allowing a little overlap into the head space but not 8 inches. This idea might be pretty expensive too and it might not deliver enough volume in the ductwork for the furnace to do it's job well. We'd be taking a 2-joist wide cold air down to 1 joist-wide and we'd be taking a 8"x24" hot air duct down to 10"x14". We could probably spare another few inches of headroom to get a hot air duct that is 15"x14" which gets us the cross sectional area that we started with. The cold air is more of a challenge.

4. Build a 30" doorway in front of this duct so that visually, the duct is obscured from plain view. The door would open and reveal the low hanging duct right in it's head space. I think this is a little sloppy, construction-wise and aesthetically, it is a slight-of-hand. Any prospective buyer would see this for what it is but because the door can be sealed, the duct can be out of sight/out of mind until you need to wash your socks. 

5. Move the furnace to the center of the house, right underneath the main East/West trunk and avoid needing the low hanging duct altogether. We can carry back the branches that go to the second floor in existing joist bays. We lose square footage having to add a second utility closet for the furnace. The existing utility closet can't shrink down because the sumps are permanently located where they are on either side of the furnace. Moreover, the gas piping to the furnace would need to be rerouted as would the venting and drainage pipes for the furnace. I don't even want to guess at what this would cost but it isn't cheap. 

Here's a 360 degree look at the offending duct:

 Looking east into the laundry room, the low duct is the one hanging North/South.  The cold air return is directly above it tucked into two joist bays. If we built a door (Option #4) it would tuck in right in front of this duct, scooched to the right of the E/W duct in this photo. If we went with option #5, the furnace would relocated to where the existing framing is bumped out on the left of the photo.

 Looking west while standing in the laundry room, the low duct is all you can see.

 Here's the low duct exiting the furnace. You can see the sheet metal above the duct fencing in the cold air return in the joist bay. (Picture taken looking south)

Here's the final view of the low duct, picture taken standing near the furnace looking northward. The duct perpendicular to the main duct travels along the main beam of the house and will be soffitted in at 6'5" along with the main beam.

Leave me a comment with your thoughts. Should we make do with what we have or should we open our wallets and stimulate the economy some more?

Sunday, October 14, 2012

Lights! Ducts!

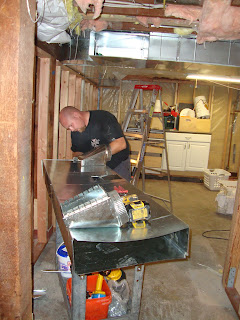
Saturday it was my birthday and Paul Simon's too. I spent the better part of the morning honoring our birthdays with an 8-album music marathon of Paul Simon tunes while Justin and Jason, a sheet metal journeyman that Justin knows, rearranged the ductwork in the basement. We now have all of the necessary ductwork to heat the basement and some of the ducts for the upstairs reorganized for optimal ceiling heights.  Being my birthday, the guys wrapped it up in the early afternoon so Justin and I could get on with our celebrating.

 Justin, a sheet metal apprentice for the day, patching the old duct for reuse.

Jason is fitting our new East/West trunk of duct with a branch for the bathroom.

Here's my new design for the mantel. Justin gave me the urn on the right for my birthday. I plan to hang a large mirror above the mantel in lieu of that too-small artwork.

We amateur electricians have nearly completed the wiring for the basement lights and about 60% of the receptacles. This is my first time really working with wiring in a house. I've done little projects here and there but I've never wired up a lighting circuit until this basement project came along. Now I've got my 3-way switch badge and new breaker badge. The best news of all is that we now have a respectable number of lights in the basement to actually carry on down there without dragging around the clamp-on construction lights. Woohoo!

Cross Post

We spent a couple of weeks in Europe last month. Check out my update on my other blog: http://www.l-c-f.blogspot.com/2012/10/oktoberfest-and-spa-mania-2012.html.

Thursday, September 6, 2012

Labor weekend

We have a theme for Labor Day weekend around here: labor. First, we made a couple of more rooms by framing up some more interior walls. We have more framing to go but we need a little rerouting of some duct work before we can finish framing the rooms. And then there are all of the soffits...(we'll be at this framing gig into November, I think.)

When we changed up the stairway lighting last month, we disconnected all of the lights in the basement so we've had a hodge podge of extension cords strung up to temporary lights. It was getting pretty annoying to feel your way down there and find a light. But, we've got switches in two rooms now and receptacles partially installed too. All in a weekend's work.

In other news, Justin and I harvested a bunch of blackberries and I whipped up 12 cans of blackberry jam (seedless!). Now that I've broken out the canner, I am planning a big can-stravaganza next weekend to fill up the larder.

Sunday, August 19, 2012

A few rooms


Despite record temperatures on Friday, our weekend was mild and a little overcast--in other words, an ideal weekend to spend in the basement! We are still busy with the stud installation and now we have nearly 3 of the 4 perimeter walls up and our new bathroom has taken shape with the plumbing rough-in and some new walls. We were at this stage three years ago on a different floor in a different season.
Handyman, Justin, ready to fasten in a 2x4.

 Lazyman Pongo, chillakin' with the studs.

Our new 1/2 bath, roughed and framed in. We still need to remove the window and replace it with something smaller.

Standing on the west side, in Justin's future workroom looking through the bathroom and laundry room.

Our new crawlspace access door. This will be the only access to the secret room under the front porch.

Sunday, August 5, 2012

Sump'thing's going on

We are officially waterproofed in the basement. The drains and sump were installed in 2 days which barely left the cats any time to play in the world's best habitrail. I am really hoping that the big pile of dirt that the crew left in the basement overnight didn't get used as a litter box.

 Here's the big hole for the sump pump, right underneath the water heater.

Pongo in the trenches. This was the BEST.GAME.EVER.

This weekend, we took the project to the next level. We were able to start framing and despite lots of automated tools, we weren't that efficient at framing. We finished the entire north wall and barely started an interior wall that will be used for plumbing. Prior to framing, we hung up 6mm visqueen on the masonry and tucked it behind the drainage membrane in case there is any condensation. If that happens, it will be routed to the perimeter drain rather than the insulation we'll be putting up.

Here's the north wall all framed up. This corner from the panel and back to the window will be our future storage room.

 
Here's the lone interior wall--95" long that took most of Sunday to put up since there are so many pieces of plumbing and ductwork to work around (and that is without actually building any soffits yet).

Sunday, July 29, 2012

And the show begins...

Our first of our subcontractors start tomorrow on the basement. Mr. Waterproofing will be in the house breaking up concrete to install a perimeter drain. To do our part, we rearranged the entire basement so that the perimeter was unobstructed, save for the furnace.

Here's a garage full of ceiling insulation that was removed for the seismic work from earlier in the year. We'll route a few new electrical circuits before reinstalling this.

Here's the basement with all of our junk lined up in the center.


Here's a bouquet I picked of Russian sage and Echinacea that had fallen too far into our pathway through the garden.

Sunday, July 22, 2012

We finally got off our duffs...

It's been an eventful summer and we've been enjoying the nice weather and relaxing our weekends away. In the meantime, our basement project has been languishing. But, we got a handful of proposals to fix our water problem in our basement and we are starting to think beyond the day that the perimeter drain is installed.

Over the past few weeks, I've been playing with the floor plan and thinking about how we might like to use the new space. One thing that was giving me trouble was a window in the closet that we've recently split into two closets. Who wants a window in a closet? Not me! This weekend we opted to close it up and I have to say that it looks about 100 times better on the outside of our house now. Before, we had a pair windows that were different dimensions so their appearance was lopsided.

Framed up...

Insulated and hemmed in with some scraps of plywood. We chose not to remove the lathe on this wall because there is blown-in insulation in the stud cavity so the plywood addition makes the plane even.


Another effort we took on was rewiring the three-way switch to give us a light at the top of the stairs to the basement. Three-way switches are tricky but I figured it out (on the second try). In my defense, the switch had some very confusing labeling on the hot and neutral terminals. I had thought I was wiring up hot to hot but the labeling got the better of me. It works now and all we need are the permanent light fixtures before we are ready for drywall in the stairwell.

An awkward angle to view the two new junction boxes wired up for control by two switches.